Showing posts with label Kids Craft. Show all posts

Friday, November 29

Polka Dot Flower Vase


Polka Dot Flower Vase


DIY Polka Dot Flower Vase

Materials: 
Empty glass bottles or mini-vases
dot labels (can get at the office supply store) if not available, use a puncher and put glue
ribbon, scissors and double-sided tape

Instructions: 
1. Have your kid decorate the vase with the dot labels. 
2. Next, measure the width of the base of the vase with ribbon and cut to fit, leaving a little extra to ensure it'll make it all the way around. 
3. Then have your kid take the double sided tape and secure the ribbon -- or they can tie it instead. 
4. Then your kid can add more ribbon or polka dots to finish his masterpiece.
This makes a perfect holiday gift for his teacher -- just add flowers!

Saturday, October 29

Toddlers Craft: Fishing Handprint


Fishing Handprint


This Fishing Handprint craft is a really fun fish craft for Preschoolers or Toddlers to make! This would also make a great Father's Day, Grandparents Day, or Sunday School craft! Decorate your fish any way you choose, and write a message in the top right corner, for example: "Happy Father's Day", "Teach a man to fish" or "Gone Fishing"

Here's what you'll need... • Construction paper
• Glue
• Pencil
• Scissors
• Twine/yarn/string
• Decorations for your fish (markers, crayons, glitter glue, stickers, etc.)


Here's how you make it... 1. Trace and cut out a hand print from construction paper, make sure you include the wrist and upper arm. Cut out a long, straight paper 'fishing pole', a short piece of 'fishing line' from your twine, and a colorful fish.


2. Now you'll need to decorate your fish. We used some glitter glue to make fins, but let the kids get creative! Once you've decorated your fish, glue the handprint onto a piece of construction paper (just glue the wrist and palm, not the fingers!), glue the fishing pole into the palm of the hand, then glue the twine onto the top of the pole, and lastly, glue the fish onto the end of the fishing line.

3. Now all you need to do is glue the fingers around the fishing pole. One by one, glue each finger tip to the palm of the handprint! If you wish, write on a special message! 

Toddlers Craft: Loaves and Fishes Necklace


Loaves and Fishes Necklace

This Loaves and Fishes Necklace is a great craft for preschoolers (and up) to go with the 'loaves and fishes miracle' bible story.
The macaroni represents the loaves and the fish represent, well, the fish. If you want to make this craft quicker or don't have any paint, just don't paint the 'loaves', perhaps you can make your fish different colors to make it more bright.


Here's what you'll need... • Macaroni with holes big enough to string (Rigatoni was used in the picture)
• Yarn or twine
• Construction paper or card stock in what ever color you’d like to make the fish
• Hole punch (scissors will work)
• Pencil
• Scissors
• Paint (optional)


Here's how you make it... 


1. If you are painting your macaroni do it now. If not, move on to step 2.

2. Cut fish shapes out of construction paper, punch or cut holes in the top to string.


3. String your macaroni and fish. If you are using yarn to string your necklace try wrapping a small piece of masking tape around the end to make it easier for little ones.

More creative Bible Arts From Busy Bee Kids Craft

Friday, October 7

Starter Craft: Things God Made Booklet


Things God Made Booklet


The Things God Made Booklet is a great craft for preschoolers on up. This craft provides a wonderful opportunity to discuss all of God's creations! Great for Sunday School teaching!


Here's what you'll need... • 4-5 pieces of construction paper, your choice of color
• Small piece of twine or yarn
• Hole punch (scissors will work)
• Magazines
• Scissors
• Glue
• Marker
Here's how you make it...
1.Cut your construction paper into pages, make them as big or small as you like. Punch two holes in each peice of paper and "bind" your book together by tying twine or yarn through the holes. On the front of the Booklet write, "Things God Made."

2.Using the magazines, cut out pictures of things that God Made, perhaps it is your favorite things? Another option is to go for a walk outside and collect some real things God made, like leaves, flowers, and pebbles. Glue all of your pictures or treasures into your book and you will have a constant reminder of all of God's beautiful creations.

Toddlers Craft: Butterfly Baggie


Butterfly Baggie

from Busy Bee Kids Craft


This butterfly Baggie is just that - a butterfly made from a regular zip-lock baggie! If you can crumple paper, you can do this craft, perfect for toddlers and preschoolers!


Here's what you'll need...• Zip-lock baggie
• Construction paper
• Pipe cleaner
• Scissors


Here's how you make it...1. Cut the top off the baggie that sticks up above the zipper.


2. Cut construction paper into squares, crumple them and place them inside the baggie. Fill the baggie about ⅔ full.

3. Squeeze out the air in the baggie and seal it tight. Gather it in the middle and wrap and twist a pipe cleaner around the center. Twirl the ends to make the butterfly's antennas. There are other ways to do this craft. You can slide flat pieces of paper inside the baggie, fold the baggie accordion-style and secure with a pipe cleaner. You can also use a clothespin for the center rather than a pipe cleaner.

Monday, September 12

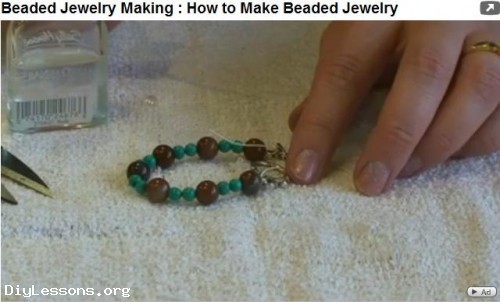
Starter Craft: Simple Beaded Jewelry


How To Make Simple Beaded Jewelry
By Sherri Osborn, About.com Guide

Picture from DiyLessons.org

Here are some easy steps in creating your own jewelry.

Here's How:
1.            Buy some elastic thread and medium sized beads. Seed beads are too small and pony beads are too big.
2.            Decide what kind of jewelry you want to make. This idea works well for necklaces, bracelets, rings, and anklets!
3.            Cut a piece of elastic thread about 2 - 4 inches longer than you need for your project.
4.            Tie a bead onto one end of the piece of thread so the other beads do not fall off once you thread them on.
5.            String desired beads onto the elastic.
6.            Tie the two ends of the elastic together.
7.            Cut off the extra thread.
Tips:
1.            Alphabet beads are fun to use for this craft!
2.            If you make bracelet or ring you will want it snug around your wrist or finger so it doesn't slide off.
3.            If you want to get fancier, you can position the beads where you want them by strategically tying small knots in the elastic.
What You Need:
•               Elastic Threads
•               Beads
More ideas in Familycraft About.com

Thursday, September 8

Teen Craft: Friendship Bracelets


Camp Crafts: Friendship Bracelets 

Tied with a Sliding Knot


How to Tie a Sliding Knot
tie a sliding knot Camp Crafts: Friendship Bracelets Tied with a Sliding Knot
How to Tie a Sliding Knot Diagram

The sliding knot diagram is easy to follow, but it can get a little tricky if you create the knot loosely and then tighten it sloppily. My advice: be really careful about keeping all the strands in place as you tighten it – trust me, it will save you plenty of headaches and tangled cording later.
sliding knot bracelet Camp Crafts: Friendship Bracelets Tied with a Sliding Knot
Make a friendship bracelet with a sliding knot
Here’s a picture of the sliding knot in action on the back of the braided friendship bracelet.

What You Need to Make These Easy Friendship Bracelets

  • Leather lacing (in at least three colors for the braided bracelet).
  • Six wooden beads with bead holes big enough for the leather lace to fit through (for the beaded bracelet).
  • You can also use colorful nylon cording instead of leather for either of these friendship bracelets.
For the beaded friendship bracelet, first cut the end of the leather lace at an angle, which will make it easier to slide on the beads. Then simply tie a regular knot, slide on a bead, and repeat until all the beads are on your bracelet.
Finish off with the sliding knot.
leather lace end for beadin Camp Crafts: Friendship Bracelets Tied with a Sliding Knot
Cut the leather lacing for easy beading
friendship bracelet with be Camp Crafts: Friendship Bracelets Tied with a Sliding Knot
Easy Friendship Bracelet with Beads
For the braided leather bracelet, knot together three strands of leather laces. Keep one of them longer than the rest on the top end, because you will use it to tie the bracelet off.
Braid the laces, then tie another knot to keep the braid together. Then simply clip off two of the three stands near the knot as shown in the first photograph below.
Finish off with the sliding knot.
braided leather bracelet Camp Crafts: Friendship Bracelets Tied with a Sliding Knot
Braided Leather Friendship Bracelet
braided friendship bracelet Camp Crafts: Friendship Bracelets Tied with a Sliding Knot
Easy Braided Leather Friendship Bracelet
Check  Craft Jr. for other camp crafts... :)

Wednesday, May 25

Kiddie Craft: Leaf Mobile

How to Make a Leaf Mobile

Teaching your kids on how to appreciate nature. I recommend this craft project. Aside from enjoying the breeze outside with the kids, you can as well hang the finished project in their rooms. Happy Crafting!


kids leaf craft project - make a mobile


You will need
A variety of different shaped leaves
Two equal sized twigs
Raffia, ribbon, fishing line, string or thread (we used raffia)
A roll of wax paper
Scissors
Punch
Warm iron and ironing board to be used by ADULTS ONLY


Instructions
1. Make a cross with the two twigs and tie them together at the centre.
2. Arrange a few leaves at a time on the wax paper and cover it with another piece of wax paper.
3. Iron the wax paper so that the wax melts and the two layers stick together with the leaves inbetween.
4. Let the children cut around the leaf shapes leaving a border of wax paper.
5. Punch a hole in the paper around each leaf help the children insert the raffia, ribbon, thread or fishing line and tie the ends.
6. Hang two leaves together as shown in the photo.
7. Hang your leaves from the twigs and then suspend your mobile in a well-lit position so that the light will catch it.
Variation – add pressed flowers, berry clusters or small cones to your fall leaf mobile.


More leaf craft at Shirleys Preschool Activities

Monday, May 23

Bookmark: Paper weaving

Here is another cute and easy to make bookmark. It is done out of weaving of paper. 
Things to make and do - Paper weaving bookmark

You will need:

- Coloured card for weaving or a piece left over from another project
- Scissors
- Erasure/Rubber
- PVA glue
-Hole punch and eyelets (optional)
- Embroidery thread or a ready made tassel (optional)
Laminator (optional) 

What to do


1. Weave your piece of card. The piece I am using is left over from another project and measures 3cm x 21cm.
2. Trim to shape
3. Make sure the weaving is stuck down securely using a small dab of PVA glue where necessary.
4. Remove any pencil marks with an erasure/rubber (the bookmark will be seen from the back and front).
5. You now have a bookmark that can be used as it is or you can put a hole near the top, add an eyelet and a tassel or laminate and then add an eyelet and tassel. 
6. I laminated my weaving so first of all I cut off the remaining fringe before laminating. If you have more than one bookmark to laminate then you can probably fit 3 or 4 on one sheet. I had nothing else ready, so I laminated it on its own.

7. After laminating leave to cool under a couple of heavy books to stop it from curling up.
8. After 10 minutes it should be ready to cut out. Remember when you are cutting around the laminated bookmark to cut aprox. ¼inch/5mm away from the weaving, if you are going to add an eyelet and tassel leave about 2cm extra on one end of the plastic for the eyelet and tassel. 
9. Adding an eyelet – work on a solid hard surface such as hardboard, or a sheet of MDF. Position the eyelet hole punch vertically onto the project surface and hit with a hammer. Push the eyelet through the hole from the front of the project. Turn your project over and lay flat on the work surface. Position the eyelet setter tool into the eyelet opening and hit with a hammer so that the eyelet becomes flattened.
Things to make and do - Paper weaving bookmark10. Adding the tassel – Thread the ends of the yarn that the tassel is hanging by through the eyelet, tie a knot 3 or 4 cm longer than you want the hanging thread to be, tying the two ends together will make a loop. Now thread the tassel through the loop and gently pull ( if it is longer than you wanted then cut a little off the end and re-tie) Trim the ends near the knot and add a small dab of fray check or super glue on the knot to stop it from unravelling. 
For a step by step guide with pictures, please visit this site Things to Make and Do

Saturday, May 21

Crafting with Preschoolers


Crafting With Preschoolers 

Summer break is just around the corner and we’re always looking for great craft project ideas to do with the kids after Mother’s day. Whether you have young kids or older school aged children, there are always fun activity ideas that are sure to keep the kids happy and the creativity flowing. Here are 5 fun craft ideas to try with your kids...

1. Painted flower pots - create pretty painted flower pots using inexpensive terracotta pots and craft paint. Let your kid’s creative take over as they decorate these simple pots into beautiful pieces of art. You can use the pots for your flowers, tomato plants or even organizing the art table inside.

2. Fun with the sun inside and out - Create sunshine inspired art and crafts to celebrate the warmth of the season. An easy project you can do together is a colored paper mosaic. Simply tear colored paper into small pieces, approximately 1” or larger in size. Put glue on another piece of paper and create a pattern or design using the small paper pieces.

3. Nature inspired art - Take a nature walk together and bring a little basket or bucket to collect various outdoor treasures. When you return home, create an art piece from your found objects. Leaves, flower petals, sticks and other items from Mother Nature make for wonderful art supplies.

Cooking on the side
4. Kitchen time - some of the best projects start in the kitchen. From science experiments to home made playdough, you’ll find a great variety of creative fun just steps away. A super easy idea for young kids is water painting. Using a paintbrush with only water on construction paper, you and your little one can paint fabulous pictures without the mess. Once the paper dries, you can start all over again.

5. Get spontaneously crafty - One of the best forms of creativity is that which is unplanned. gather up a box of random items to use. Things such as recycled cans, craft paint, glue and miscellaneous found objects can be combined with a little imagination to create fantastic inventions. Brainstorm with your child to come up with creatures, art or gadgets made with your box of goodies.

Enjoy some time together creating something wonderful!

Friday, May 13

Step by Step Guide in Making Sand Casts


Sand Casts


Submitted by Karen Hunady from 
Crafts For All Seasons...

Sand casts is a wonderful tradition to start with your children, especially if you visit beaches every year. It will be fun to see how much they have grown year after year. Because It is easy and fun to make, you can also do this craft in your backyard sandbox. It can be framed, used as paper weights, a décor for your wall.


Materials
  • Sand (at the beach or in the sandbox)
  • Plaster of Paris
  • Pail
  • Shovel or other mixing tool
  • Your child's hands and feet
 Instructions

1. Begin the sand casts by "fluffing" up the sand a little. Use a sand rake or sand shovel to rough it up. You don't want the sand to be too packed down or you will not get a deep mold. Next, place your child's hands and feet deep into the sand. Tell them to push down hard. For a small child, it helps if you push down each little finger and toe deeper into the sand. Then, help your child off and take a look at the molds. You want the molds to be deep enough to hold plaster. Re-do them if necessary.


2. Next, mix up the Plaster of Paris in the sand bucket with some water (water from the lake or ocean is just fine). Read the package instructions, it is usually 1 part plaster to 2 parts water. Mix it up using a sand shovel or stick. You want the consistency to be like a thick gravy, but thinner than pudding. Make sure to get all the lumps out. Then gently pour the plaster mixture into the molds. If you make a thinner plaster mix, the mix will have no problem filling in the little toes and fingers, but you can also use a small stick to help guide the plaster mix throughout the mold if necessary. If desired, you can add a small cord or a hook to the back of the mold for a wall hanging.


3. Now you wait for them to dry. Do not be too anxious! It takes a least 30 minutes. It is best to do this activity soon after arriving at the beach, then you can remove the molds later in the day when you are ready to leave. Carefully remove the molds and rinse them off really well in the water. Mark the back of each mold with a permanent black marker with the child's name, age, and vacation spot, if you like.

Tuesday, May 10

PHOTO FRAMES FROM CD BOXES


Project: Photo Frames from CD Boxes
by http://www.allcrafts.net

Grandparents, aunties and uncles and godparents always love to get photos of their favorite children. Nice frames can be expensive to buy and impersonal too. Why not get your children to help you create some frames with bits and pieces you have lying around your house? You will all have great fun doing it and will produce fun little frames that will be especially treasured because the kids had a hand in making them. Be warned – this idea is addictive!

You will need:
Empty CD boxes
Scissors and glue
Craft supplies and household bits and pieces (see suggestions below)
We always seem to have empty CD boxes lying around – and if you don’t, you can buy them very cheaply at computer stores.

Instructions:
Open your CD box and take out the paper inserts and the molded plastic piece into which the CD itself fits.


Cut your photo to just smaller than the box. You will be fitting it into the back of the box with the hinged edge at the top, so about 4 inches wide and 4 ¾ inches high is perfect, but don’t worry too much! Fix the photo against the plastic with a few small pieces of sticky-tape. Find a nice piece of cardboard, gift wrap or fun foam which will complement your design and cut this to fit snugly behind the photo and to the edges of the frame (4 ¾ inches wide, 5 ¼ inches high). Fix with glue or sticky-tape with the pattern, if any, facing into the box. When your frame is finished you will open the box out to stand it up, so this backing protects your photo.


Now all you need to do is draw a line of glue on the outside edges of the front of the CD box and start decorating! Use whatever you have to hand. You can build on the theme of the photo, the season, or the particular interests of the recipient. Our examples above are obviously on a Christmas theme.


Artwork instead of a photo
Another idea is to use some “artwork” which the children have created instead of a photo, and surround it with something which complements the work. Get a little one to write “I Love You Granny” in their best writing and then stick on their own choice of stickers and beads, and you will have created a present which will be treasured forever!


Here are some decorating ideas to get you started:


For photos of girls:
  • Sparkly beads – either individual or pre-strung necklaces
  • Pearl beads (you may be able to buy an old “pearl” necklace in a charity shop cheaply)
  • Jewels (available from craft shops)
  • Glass nuggets (for flower arranging, they come in gorgeous colours)
  • Tiny silk flowers
  • Pretty flower braid, with the individual flowers cut apart and interspersed with silk leaves or green ribbon
  • Tiny Barbie figures (fast food give-always)
  • Left over or “odd” doll’s shoes and accessories
For photos of boys:
  • Jelly beans
  • Tiny plastic soldiers
  • Tiny cars
  • Wheels of assorted shapes and sizes!
  • Lego pieces. This looks great!
  • Peanuts in shells
  • Toy insects, plastic dinosaurs or farm animals
  • Stamps (buy a collectors’ pack of football stamps, for example)
  • Left-over or “odd” action man accessories – shoes, boots, helmets etc

More Craft Ideas…